Oven Roasted Turkey
A frozen turkey's journey from the store to your table as a Perfect Oven Roasted Turkey.
You'll need to bring your frozen project home at least one week prior to the day you will be roasting and serving it. Butterball® recommends 1 day in the refrigerator for every 4 pounds.
Pre-Seasoning - 2 days prior to T-Day
- 1 TBSP Sea Salt
- 1 TBSP White Sugar
- 1/2 tsp Black Pepper
- 1/2 tsp Smoked Paprika
- 1/8 tsp Garlic Powder
- 1/8 tsp Dry Chipotle Powder
- Mix salt, sugar and spices together.
- Remove the giblets and any extra parts from the turkey's cavity. Rinse and pat it dry.
- You are now the proud owner of "extra parts" & a bag of offal. Do with these as you wish. Not wasting much around here, I usually make broth out of the neck and freeze the liver to make pâté later.)
- Sprinkle pre-seasoning mixture all over and inside the bird, make sure to coat cavity and the breast just under the skin at the neck opening.
- Place in a roasting pan on a wire rack, breast down. Refrigerate, loosely covered for 24 hours.
- After 24 hours uncover, drain any juices off and turn breast side up. Pat dry and return to the refrigerator uncovered for another 24 hours. This will dry the turkey and help the skin become brown and crispy during roasting.
T-Day
- 2 TBSP Browned Butter (Softened)
- 1 Small Onion, large chopped
- 1 Carrot, large chopped
- 1 Stalk Celery, large chopped
- 1 Cup Broth or Water
Cooking Directions
- The day you plan to roast the turkey check it in the early morning to make double sure your bird is indeed thawed and ready for it's trip through the oven and onto the table. If it is, rest easy. If isn't, FREAK OUT! Quick! Google " how to thaw a frozen turkey ".
- Remove the turkey from the refrigerator 2 hours before cooking to "temper". Removing the chill of the refrigerator will help your bird cook more evenly.
- Place oven rack at the next to bottom position and preheat oven to 450°
-
Drain juice from pan. Rub the bird with Browned Butter and loosely pack chopped vegetables in the cavity. You will notice there is no mention of "stuffing". The reason for this is twofold.
A) Stuffing a turkey makes the whole contraption more dense, skews cooking times making it difficult to achieve a fully cooked - moist bird.
B) Stuffing is the bane of a southern woman's existence. We enjoy dressing 'round here. - Pour broth or water into the bottom of your roasting pan.
- Bake breast side down at 450° for 20 minutes. Lower temperature to 325° set oven timer for 2 hours. Walk away.
-
When your oven timer goes DING, flip that hot as fire bird breast side up, lower oven temp to 225°, continue cooking for... this is where your math skills come in handy.
14 minutes for every pound of bird. Mine was 15 pounds.
14 Minutes X 15 Pounds = 210
210 ÷ 60 = 3.5 hours
3.5 hours - 20 minutes @ 450° - 2 hours @ 325° = about 1 hour 15 minutes @ 225° - If needed, change your oven setting to broil for the final few minutes to brown the breast.
-
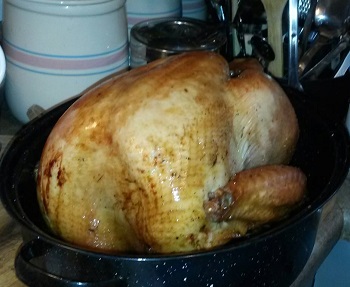
Check for internal temp and doneness (A Consumer Guide to Safely Roasting a Turkey)
It is a fine line we are walking. We want our birds to be done, but not over done and dry. You want the juices at the leg joints to run mostly clear with an everso slight tint of pink. Once the turkey leaves the oven for the very last time it's internal temperature will continue to rise (from the heat retained in the bones) by as much as 5° - Let the bird rest for at least 30 minutes before carving. It is really tired at this point and letting it "rest" will allow all of those delicious, hot juices to settle back into the meat.